ShareThis

September 17, 2013

How to determine the gender your Desktop or laptop


I recently discover this funny and interesting VBS code to determine whether the Desktop or Laptop that you’re using is a male or female. To try it, follow the steps below.

Step 1. Open Notepad.

Step 2. Copy and paste the code below;

CreateObject("SAPI.SpVoice").Speak"I love you very much"

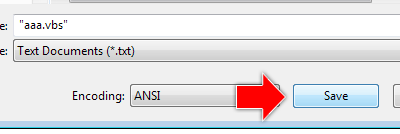
Step 3. Save it as "aaa.vbs".

How to determine the gender your Desktop or laptop


Step 4. After this file has been created then double click.

Note: Make sure the speaker of your desktop or laptop is turn on with an appropriate volume level.

AutoCAD command line disappeared - Solve

For whatever reason, AutoCAD command line or command window which is located at the bottom of your application is disappear. To let it appear again, just press "Ctrl" + "9". Cheers

September 02, 2013

Selecting printers in MS Excel not responding - Solve

Recently, we encountered this weird problem with MS excel in windows 7 Pro, in the print section, Choosing a specific printer to print my file makes my PC hangs up. Fortunately, my colleague has a clever solution and this is how he do it.

Step 1. Go to "Device and Printers" and it will display all the installed printers on the PC.

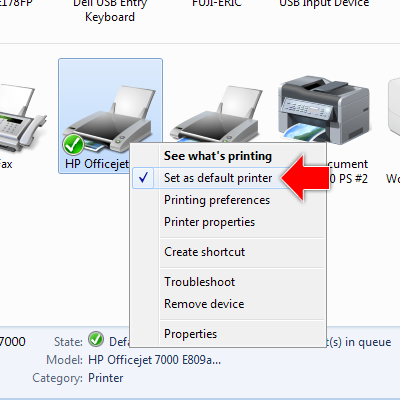
Step 2. Select the printer the you wish to use and right click, select "Set as default printer".

Selecting printers in MS Excel preview hangs up - Solve

Step 3. Open the excel file that you wish to print. Press "Ctrl" + "P", in the print dialog box, you will notice the printer that you set to default previously will appear automatically under the "Printer Name".

This steps is not a solution to the problem but the idea is that searching some workaround just to finish the important task that is assigned to you. Cheers!

How to import bookmark (Mozilla, Chrome and Internet Explorer)

Importing a bookmark is very useful when you are transferring to a new PC or your PC is newly formatted.
You don't have to remember and bookmark manually all your favorite websites in this easy simple steps.

For Mozilla
Step 1. Press "Ctrl" + "Shift" + "B".

Step 2. A "Library" window box appear, click "Import and Backup".

Step 3. Then click "Import bookmarks from HTML" and navigate to the "HTML" file that was previously saved during exporting of bookmarks and click "Open".

or

Step 1. Under "Import and Backup", you have the option to directly import from any browser that is currently installed on your PC.


For Chrome
Step 1. Press "Ctrl" + "Shift" + "O".

Step 2. A "Bookmark Manager" window tab will appear, click "Organize" -> "Import bookmarks from HTML file...".

Step 3. Look for "HTML" file and click "Open".

or

Step 1. Press "Alt" + "E".

Step 2. Select "Bookmarks" -> "Import bookmarks and settings...", you can import from any browser same in Mozilla.


For Internet Explorer
Step 1. "Ctrl" + "Shift" + "I", a new pane window will appear

Step 2. Click on "Add to Favorites..." -> "Import and Export...", same as to the previous browser, you have the option to either to import from another browser or from "HTML" file.

Cheers!

September 01, 2013

Margin problems when printing on Xerox machine SOLVE

One of my colleagues are having problems with our Xerox machine printer. When previewing his report using MS word on Windows 7 Pro OS, it looks fine but when printing, the margin is not even specially on the right of the paper. Upon trial and error, he got it right and this is how he do it.

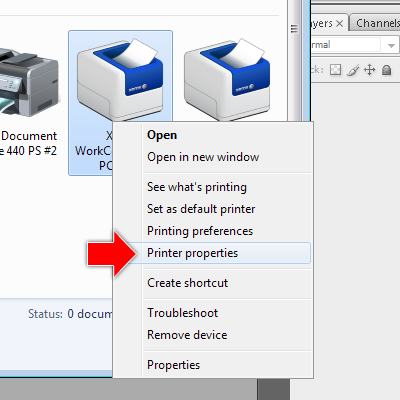
Step 1. Go to "Devices and Printers" and all lists of installed printers will be displayed.

Step 2. Select the printer (Xerox) and right click then select "Printer properties".


Margin problems when printing on Xerox machine SOLVE

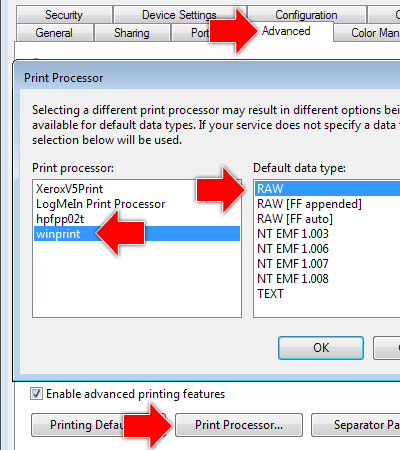
Step 3. Under printer property box, select the "Advance" tab and click "Print Processor...".

Step 4. On the "Print Processor" window box, select "winprint" for "Print processor" and "RAW" on the "Default data type:".


Margin problems when printing on Xerox machine SOLVE

And it solves the problem. Cheers!

August 22, 2013

How do I delete browsing history and clear cookies on my browser

Browsing history is a lists of websites saved in any internet browser every time the user surf the net. This is to provide a go back to pages that the user previously visited. It is saved based on months for Firefox Mozilla and date, time for Chrome.

On the other hand, a cookie or other call it browser cookie is a small piece of text file saved on to the users  PC everytime the user load a website. The purpose of this is to store the informations like users preferred language and settings so that everytime the user visit the same site, there's no need to manually configured again the user preferred settings to that site.

For safety and security purposes, the user needs to delete it all. Here's how to do it,


For FireFox Mozilla browser
Step 1. Press "Ctrl" + "Shift" + "Delete".

Step 2. A "Clear Recent History" window will pop up. Under "Time range to clear" dropdown button, the user has 3 options what range of history to be deleted.

Step 3. Click "Details" dropdown button, be sure "Browsing & Download History" and "Cookies" are selected
.
Step 4. Click "Clear Now" button.


For Chrome browser
Step 1. Press "Alt" + "E" to pop up menu.

Step 2. Select "Settings", scroll to bottom of the page and click "Show advance settings..."

Step 3. Click "Clear browsing data..." and go to "Privacy"

Step 4. Under "Privacy", click "Clear browsing data..." button

Step 5. A new window "Clear browsing data" will pop up, checked "Clear browsing history" and "Delete cookies and other site and plug-in data".

Step 6. Click "Clear browsing data" button.


For Internet Explorer browser
Step 1. On the menu bar, Press "Ctrl" + "Shift" + "Delete".

Step 2. On the "Delete Browsing History" window, checked "Preserve Favorites website data" and "Cookies".

Step 3. Click "Delete" button.

All of the above steps are based on updated browser that I have, it is not guarantee that this steps will still be valid for any future browser update release. Cheers!

Forwarding sms on iphone - How to

Recently, my colleague has a new iphone and asking me how to forward SMS since he is new also to this device.

This how to do it,

Step 1. Go to your "Messages" apps as shown below.

Forwarding sms on iphone


Step 2. Select the SMS that you want to forward.

Step 3. On the upper right side of screen, tap "Edit" button.

Step 4. Tap the SMS to enable the "Forward" button on the lower right of the screen.

Step 5. Tap the the "Forward" button and it will ask you the mobile number, if the person's number is already in your iphone contacts, just tap the plus (+) icon to redirect to your contacts and select the name.
You have also the option to send it to more than two contacts.

Step 6. Tap the "Send" button. 

That's all and have a Good Day!

August 21, 2013

How to clear call log on iphone

Sometimes we feel like our call log history is over populated and we need to clear it at once, this is how to do it

Step 1. Go to your "Phone" apps.

clear call log on iphone

Step 2. Tap on the "Recents" and it will shows all your previous calls.

Step 3. On the upper right side of your screen, tap "Edit" button and automatically, "Clear" button will appear.

Step 4. Tap the "Clear" button and "Clear All Recents", all log calls will be gone.

Cheers!

Show iphone battery percentage - Beginners Guide

From this
iphone battery percentage

To this
iphone battery percentage

For convenience and precise monitoring of how much battery remains on your iphone 5, this is how to do it.

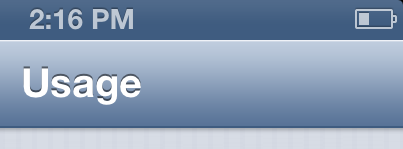
Step 1. Go to "Settings"->"Usage" and navigate down to "Battery Usage"
Step 2. Turn on "Battery Percentage"

And that's it. Cheers!

August 20, 2013

Deleting multiple photos on iphone - How to

Ever wonder how to delete multiple selected photos on your iphone, this is how to do it,

Step 1. On your iphone, open "Photo" apps -> "Cameral Roll".

Step 2. Tap the icon show below which is located at the bottom of the screen.

Deleting multiple photos on iphone

Step 3. Select multiple pictures that you wish to delete and tap "Delete" button.

To avoid unwanted delete, double check the selected photos before execution. Cheers!

How to display thumbnails in windows 7

By default, windows 7 thumbnails feature is disable for it can slow down the performance of your computer when loading the pictures to preview. To enable, follow the steps below.

Thumbnails disable

How to display thumbnails in windows 7


Thumbnails enable

How to display thumbnails in windows 7

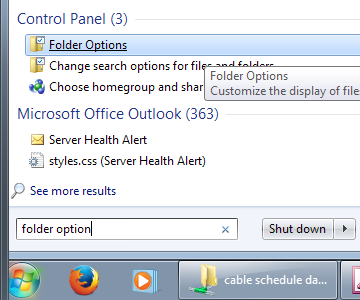
Step 1. Open “Folder Options”

How to display thumbnails in windows 7

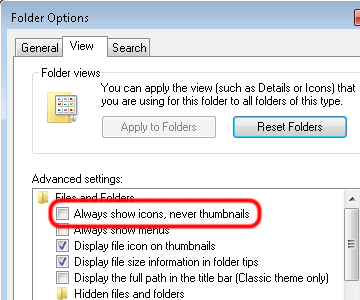
Step 2. On the “Folder Options” window, select view tab and unchecked “Always show icons, never thumbnails”


How to display thumbnails in windows 7

Step 3. Click "OK"

For slow desktop machine, this setup is not recommended. Cheers!

Microsoft word keyboard shortcuts that saves time

Microsoft word is the popular software use for making reports and documentation for its flexibility and user friendly. Increasing your productivity can save you a lot of time so here’s a number of shortcuts I compile for your reference.

1. Copy Shortcut - simply select the words or sentence to copy then press “Ctrl” and hold then press “C”.

2. Paste Shortcut - after performing the copy shortcut, just position your cursor where you want to paste then press “Ctrl” and hold then “V”.

3. Select All Shortcut - If you have more than two pages of reports, selecting all text by dragging the mouse all the way down is not a good idea, instead press “Ctrl” and hold then “A”.

4. Adjusting font size shortcut - Simply select the word to adjust the size and then press “Ctrl” and “Shift” simultaneously and hold then press “>” to increase or “<” to decrease the font.

5. Saving Shortcut - Saving your work from time to time is highly recommended and can be perform quickly by pressing “Ctrl” and hold then “S”.

How to fix network limited connectivity in Windows 7


Recently my colleague was asking me because he has some network problem. His desktop PC network status shows limited connectivity. So I checked the network cable, ethernet switches and DHCP server, everything seems working fine. I disabled and enabled the network adapter a couple of times and the problem still exist.

Our IT personnel takeover to fix and he solve the problem and this is how he do it.

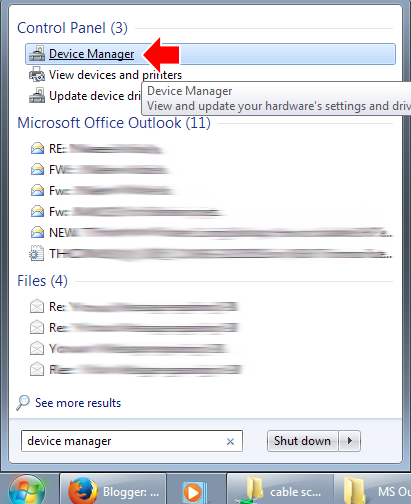
Step 1. Open "Device Manager"

How to fix network limited connectivity in Windows 7


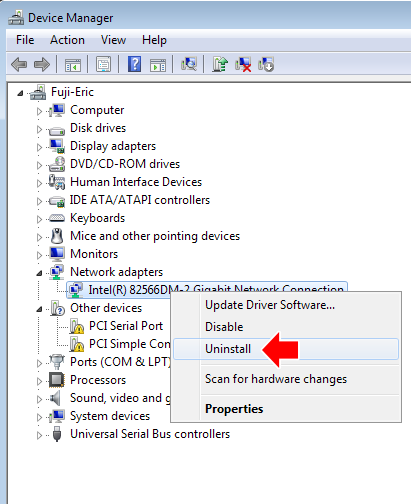
Step 2. Under "Network adapters", right click on the network connection driver and uninstall.


How to fix network limited connectivity in Windows 7


Step 3. On the "Confirm Device uninstall", DO NOT check the "Delete the driver software for this device" and click "Ok".


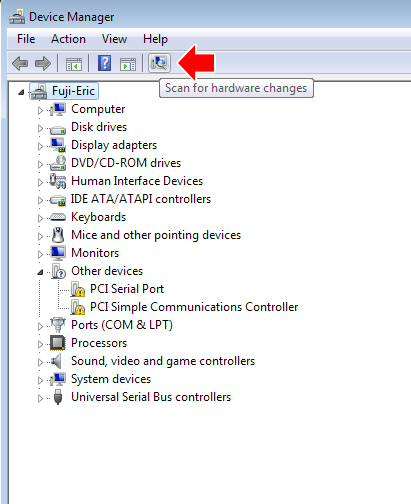
Step 4. After uninstalling, click on the icon "Scan for hardware changes" to reinstall the driver.

How to fix network limited connectivity in Windows 7

Installation duration will depend on the PC performance but I will not take too long. Cheers!

August 19, 2013

PDF batch plot in autocad 2012 - Windows 7

I've been testing a several third party software just to batch plot or convert a hundreds of DWG files into PDF in order for us to share drawings for our client. Almost all of this software have their own limitations since they are all trial versions and downloaded from internet. I keep on searching and reading until one of my colleague tough me how to do it in AutoCAD only.

Requirements:
a. Adobe Pro 8 and later
b. AutoCAD 2012 and later (Well, I don't know what previous versions of autocad where batch plot was first introduce)

To batch plot DWG MODEL
Step 1. Check if you have "Adobe PDF" printer, for Windows 7 Pro just go to "Devices and Printers"

Step 2. Open DWG file in AutoCAD application

Step 3. Go to "File->Page Setup Manager" and Click "New"

Step 4. Under "New page setup name:", you can put any name but for me, I prefer "PDF" to easily distinguise and click "Ok"

Step 5. "Page Setup - Model" window will automatically pop up, under printer/plotter Name:, select "Adobe PDF", plot area must be set to "Extents" and do the other necessary settings like paper size and etc. and click "Ok"

Step 6. Close "Page Setup Manager"

Step 7. Go to "File->Publish"


Step 8. On the "Publish" window box, under "Sheet Name" column, if files consist of both model and layout space, you can select all layout space and delete it for we are only after for the model space.

Step 9. Click "Add Sheets" button (the one with plus icon and green color )

Step 10. On the "Select Drawings" window box, under "Include" dropdown selection box, select "Model" only, then navigate and select to the files that you want to batch print and click "Select" button.

Step 11. On the "Publish" window box, under "Sheet Name" column, select one DWG file and press "Ctrl" + "A", to highlight all files.


Step 12. Under "Page Setup" column, click dropdown selection box and select "PDF"

Step 13. On "Publish Output", unchecked "Publish in background" to monitor the printing when it's done and click "Publish".

Step 14. Automatically "Save PDF File As" window box will appear, navigate to the folder you want to save the PDF file and click "Save".

Step 15. After successfully batch printing, you can now open the newly printed PDF file with Adobe Pro 8


To batch plot DWG Layout
Step 1. Follow above Step 1 to 7.

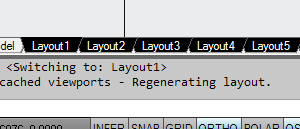
Step 2. Select "Layout1" tab and right click and select "Select All Layouts" to highlighted all the layouts.
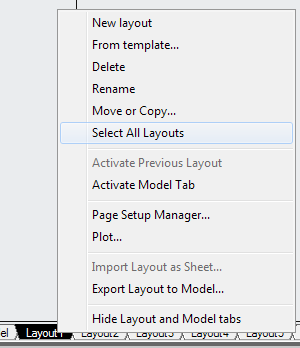
PDF batch plot in autocad 2012  - Windows 7

PDF batch plot in autocad 2012  - Windows 7

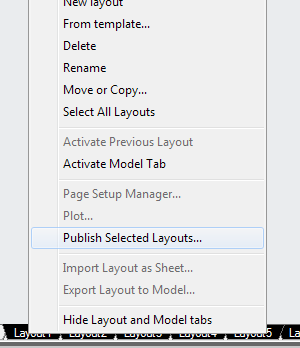
Step 3. Again, right click "Layout1" tab and this time select "Publish Selected Layouts..."


PDF batch plot in autocad 2012  - Windows 7

Step 4. Follow above Step 12 to 15.

Cheers

How to add text in Autocad 2012

This is applicable to AutoCAD version (2012 to 2007)

To add text in autocad, use “text” or “mtext” command, I prepare to use “mtext” over “text” command for I have a lot of controls with the text properties.

Step 1. On the AutoCAD command window, type “mtext”.

add text in autocad


AutoCAD command prompts “Select the first corner”Step 2. Just simply drag the mouse on the drawing area.

Step 3. Type the text you want to add. If you wish to increase the size, simply increase the 0.2 default text height.

add text in autocad

Step 4. When your done, simply click outside the box of your text formatting window.

You’re done!

August 15, 2013

Rotate a PDF and save it

Its been 6 months since my problem with scanned PDF orientation has began. Everytime I close and open a pdf scanned document, I keep on rotating the page to its correct orientation. Finally, I've got a solution about a week ago to put its page orientation permanently.

Requirements: Adobe Pro 8 or later

Step 1. On your keyboard, just press "Shift" + "Ctrl" + "R" simultaneously.

Step 2. Select the desired page direction.

Step 3. Save it.


Cheers

"No service" on iphone after payment for monthly subscription

After I pay my monthly 3G internet subscription for my iphone, it shows "No Service". So I immediately go to my mobile carrier customer service to report the problem. This is unbelievable, what they did is they temporarily remove the micro SIM and insert it again.

Lol

Speed dial avaya phone setup

Avaya IP phone doesn't comes with speed dialing features but there's a workaround on how to do it.

Note: This configuration is only valid for AVAYA IP phone model 1616 and 1608


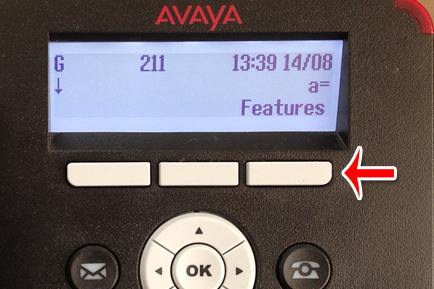
Step 1. Press the gray button that correspond the "Features" on the screen of the phone.


Step 2. Navigate to "Features->Phone User->Self-Administer->Abbreviated Dial".

Step 3. Now the screen prompted "Press Button To Assign", you must type the telephone number first before assigning the button.

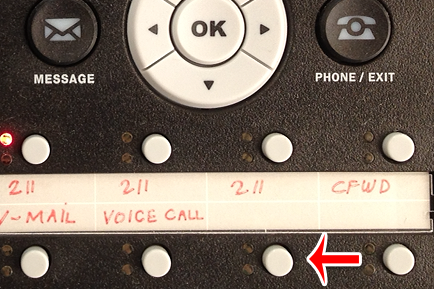
Step 4. Press button that you what to speed dial.


In my case, I selected this button.

Step 5. Screen prompted to "Save", press the button to save or it says "Replace" if already assigned to a particular telephone number.

To speed dial, just press the button that was previously setup and it will automatically dial to the number that previously assigned.

Enjoy

August 13, 2013

Viber on iphone is not ringing

My friends keep telling me why I am not answering my viber, I checked my iphone 5 and saw a lot of missed calls on my recent list. The problem is that when somebody call using viber, my iphone 5 doesn't ring.


Solution
Step 1. Check if iphone 5 is not in silent mode

or

Step 2. Go to "Settings->Notifications"

Step 3. Select "Viber" apps

Step 4. Turn on "Notification Center"

Step 5. Under Alert Style, must be set to "Banner" or "Alerts"

Step 6. "Badge App Icon", "Sounds" and "View in Lock Screen" must be turn on.

Cheers

July 05, 2013

Maximum length for meta name title and best for SEO

In order for a meta tag title and description to be search engine friendly, it is recommended that the number of characters would be 55 for the title and 150 for description.

As an example, I have a blog title "How to backup and restore settings on Thomson Speedtouch ST605 router." that exceed 55 characters. This is what google search engine will display.