For whatever reason, AutoCAD command line or command window which is located at the bottom of your application is disappear. To let it appear again, just press "Ctrl" + "9". Cheers

Showing posts with label AutoCAD for Beginners. Show all posts
Showing posts with label AutoCAD for Beginners. Show all posts
September 17, 2013
August 19, 2013
PDF batch plot in autocad 2012 - Windows 7
I've been testing a several third party software just to batch plot or convert a hundreds of DWG files into
PDF in order for us to share drawings for our client. Almost all of this software have their own limitations since they are all trial versions and downloaded from internet.
I keep on searching and reading until one of my colleague tough me how to do it in AutoCAD only.
Requirements:
a. Adobe Pro 8 and later
b. AutoCAD 2012 and later (Well, I don't know what previous versions of autocad where batch plot was first introduce)
To batch plot DWG MODEL
Step 1. Check if you have "Adobe PDF" printer, for Windows 7 Pro just go to "Devices and Printers"
Step 2. Open DWG file in AutoCAD application
Step 3. Go to "File->Page Setup Manager" and Click "New"
Step 4. Under "New page setup name:", you can put any name but for me, I prefer "PDF" to easily distinguise and click "Ok"
Step 5. "Page Setup - Model" window will automatically pop up, under printer/plotter Name:, select "Adobe PDF", plot area must be set to "Extents" and do the other necessary settings like paper size and etc. and click "Ok"
Step 6. Close "Page Setup Manager"
Step 7. Go to "File->Publish"
Step 8. On the "Publish" window box, under "Sheet Name" column, if files consist of both model and layout space, you can select all layout space and delete it for we are only after for the model space.
Step 9. Click "Add Sheets" button (the one with plus icon and green color )
Step 10. On the "Select Drawings" window box, under "Include" dropdown selection box, select "Model" only, then navigate and select to the files that you want to batch print and click "Select" button.
Step 11. On the "Publish" window box, under "Sheet Name" column, select one DWG file and press "Ctrl" + "A", to highlight all files.
Step 12. Under "Page Setup" column, click dropdown selection box and select "PDF"
Step 13. On "Publish Output", unchecked "Publish in background" to monitor the printing when it's done and click "Publish".
Step 14. Automatically "Save PDF File As" window box will appear, navigate to the folder you want to save the PDF file and click "Save".
Step 15. After successfully batch printing, you can now open the newly printed PDF file with Adobe Pro 8
To batch plot DWG Layout
Step 1. Follow above Step 1 to 7.
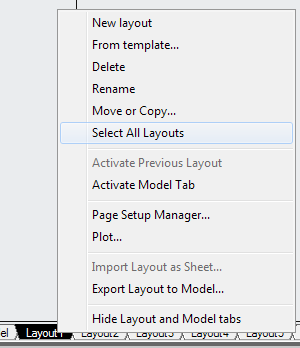
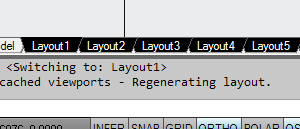
Step 2. Select "Layout1" tab and right click and select "Select All Layouts" to highlighted all the layouts.
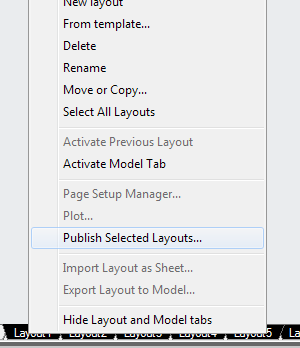
Step 3. Again, right click "Layout1" tab and this time select "Publish Selected Layouts..."
Step 4. Follow above Step 12 to 15.
Cheers
Requirements:
a. Adobe Pro 8 and later
b. AutoCAD 2012 and later (Well, I don't know what previous versions of autocad where batch plot was first introduce)
To batch plot DWG MODEL
Step 1. Check if you have "Adobe PDF" printer, for Windows 7 Pro just go to "Devices and Printers"
Step 2. Open DWG file in AutoCAD application
Step 3. Go to "File->Page Setup Manager" and Click "New"
Step 4. Under "New page setup name:", you can put any name but for me, I prefer "PDF" to easily distinguise and click "Ok"
Step 5. "Page Setup - Model" window will automatically pop up, under printer/plotter Name:, select "Adobe PDF", plot area must be set to "Extents" and do the other necessary settings like paper size and etc. and click "Ok"
Step 6. Close "Page Setup Manager"
Step 7. Go to "File->Publish"
Step 8. On the "Publish" window box, under "Sheet Name" column, if files consist of both model and layout space, you can select all layout space and delete it for we are only after for the model space.
Step 9. Click "Add Sheets" button (the one with plus icon and green color )
Step 10. On the "Select Drawings" window box, under "Include" dropdown selection box, select "Model" only, then navigate and select to the files that you want to batch print and click "Select" button.
Step 11. On the "Publish" window box, under "Sheet Name" column, select one DWG file and press "Ctrl" + "A", to highlight all files.
Step 12. Under "Page Setup" column, click dropdown selection box and select "PDF"
Step 13. On "Publish Output", unchecked "Publish in background" to monitor the printing when it's done and click "Publish".
Step 14. Automatically "Save PDF File As" window box will appear, navigate to the folder you want to save the PDF file and click "Save".
Step 15. After successfully batch printing, you can now open the newly printed PDF file with Adobe Pro 8
To batch plot DWG Layout
Step 1. Follow above Step 1 to 7.
Step 2. Select "Layout1" tab and right click and select "Select All Layouts" to highlighted all the layouts.
Step 3. Again, right click "Layout1" tab and this time select "Publish Selected Layouts..."
Step 4. Follow above Step 12 to 15.
Cheers
How to add text in Autocad 2012
This is applicable to AutoCAD version (2012 to 2007)
To add text in autocad, use “text” or “mtext” command, I prepare to use “mtext” over “text” command for I have a lot of controls with the text properties.
Step 1. On the AutoCAD command window, type “mtext”.

AutoCAD command prompts “Select the first corner”Step 2. Just simply drag the mouse on the drawing area.
Step 3. Type the text you want to add. If you wish to increase the size, simply increase the 0.2 default text height.

Step 4. When your done, simply click outside the box of your text formatting window.
You’re done!
To add text in autocad, use “text” or “mtext” command, I prepare to use “mtext” over “text” command for I have a lot of controls with the text properties.
Step 1. On the AutoCAD command window, type “mtext”.
AutoCAD command prompts “Select the first corner”Step 2. Just simply drag the mouse on the drawing area.
Step 3. Type the text you want to add. If you wish to increase the size, simply increase the 0.2 default text height.
Step 4. When your done, simply click outside the box of your text formatting window.
You’re done!
January 07, 2012
How to Batch Publish AutoCAD drawing to PDF or DWF
Batch publish autocad drawings to pdf or dwf can be done by installing a free plugin called DWF/PDF Batch Publish from Autodesk website.
This plugin can be used with AutoCAD to simplify the process of publishing sets of drawings to DWF and/or PDF. It runs as a command within AutoCAD - as opposed to a separate executable - and uses a separate executable to monitor AutoCAD's health and restart it, as needed. The status of the batch publishing operation is stored to disk, allowing it to pick up from where it left off and also for any failed documents to be retried without starting from scratch. A setting is available to only publish drawings that have been modified since they were last published, making it easier to publish sets of documents on a regular basis.
To install, follow the steps below:
1. After downloading the plugin, unzip and put to a folder where it can easily find. Be sure “ADNPlugin-BatchPublish.dll” and “ADNPlugin-BatchPublishRegulator.exe” would come together under same folder.
2. On your AutoCAD command window, type “NETLOAD” and hit “Enter” key

3. “File browser window” will popup, navigate to the folder where DWF/PDF Batch Publish plugin was save and look for “ADNPlugin-BatchPublish.dll” and click “Open”
3. “File browser window” will popup, navigate to the folder where DWF/PDF Batch Publish plugin was save and look for “ADNPlugin-BatchPublish.dll” and click “Open”
Now the installation is done. To use this plug in
4. On your AutoCAD command window, type “BATCHPUBLISH” and hit “Enter” key
5. “Batch Publish” window will popup.
On the “Source DWG/DXF path:”define the path by clicking the “…” button where the autocad drawings to be converted were saved.
4. On your AutoCAD command window, type “BATCHPUBLISH” and hit “Enter” key
5. “Batch Publish” window will popup.
On the “Source DWG/DXF path:”define the path by clicking the “…” button where the autocad drawings to be converted were saved.

6. Check the box for PDF or DWF and point to the folder where the converted files to be save and click “Publish”
You’re done!
December 30, 2011
How to Force Delete Layer in AutoCAD
Sometimes DWG file contains too many unnecessary layers that will affect the performance when working this file. If this layer is already reference to an object or geometry, it can’t be deleted using the “Layer Manager Properties” hence force delete can be done by performing the “laydel” command. Before performing this guide, be sure the layer to be deleted is not the current layer for it will not appear on the “Delete Layers” window.
On the command window of your AutoCAD.
1. Type “LAYDEL” and press "Enter"

AutoCAD prompt “Select object on layer to delete or [Name]”
2. Type “N” and press "Enter"
”Delete Layers” window will popup
3. Select the layer you wish to delete
4. Click “OK”
You’re done!
On the command window of your AutoCAD.
1. Type “LAYDEL” and press "Enter"
AutoCAD prompt “Select object on layer to delete or [Name]”
2. Type “N” and press "Enter"
”Delete Layers” window will popup
3. Select the layer you wish to delete
4. Click “OK”
You’re done!
Subscribe to:
Posts (Atom)